As a new yoga person, you might feel overwhelmed by the sheer number of poses used in office and their odd-sounding names. But yoga doesn’t have to be hard. If you got out of bed this morning and stretched your arms up over your head, you already did a yoga pose. And remember that your yoga practice is a lifelong pursuit—giving you plenty of time to learn scores of postures.
Also Read: 37 Things Everyone Knows About Yoga Benefits
While there is no definitive way to categorize yoga postures, there are 10 main physical orientations that can be helpful for researching and sequencing asanas. In general, these groups of yoga poses will share similar energetic and physical effects while working in office.
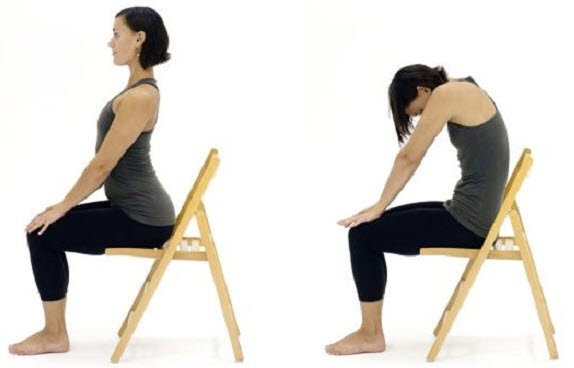
1. Seated Cat/Cow
Creates a more flexible spine, reduces back, neck and shoulder tension, facilitates deeper breathing, strengthens back, tones the abdominal muscles and much more.
Instructions –
- Step 1: Sit on your desk chair, away from your desk, with your feet flat on the floor, legs at 90 degrees. Sit slightly forward from the back of the chair, so you have room to move through the stretch. Place your hands on your knees.
- Step 2: Sitting up tall, as you exhale, round your back, pulling your abdominals into your spine, tucking your tailbone under and tucking your chin into your chest. Be as round as you can be, pushing your mid back toward the back of the chair behind you (but not actually touching). Arms should be straight.
- Step 3: As you inhale, allow your belly to move forward, arch your back, send your heart forward and (if your neck is okay) look up to the ceiling. Relax your shoulders and jaw.
- Step 4: Repeat this motion several times, exhaling back and inhaling forward. Close your eyes if you feel comfortable, taking your attention inwards.
- Step 5: When you feel you have had enough, stop in the middle, sit up tall, breathe normally and notice how you feel differently. Return to work refreshed and innergized!
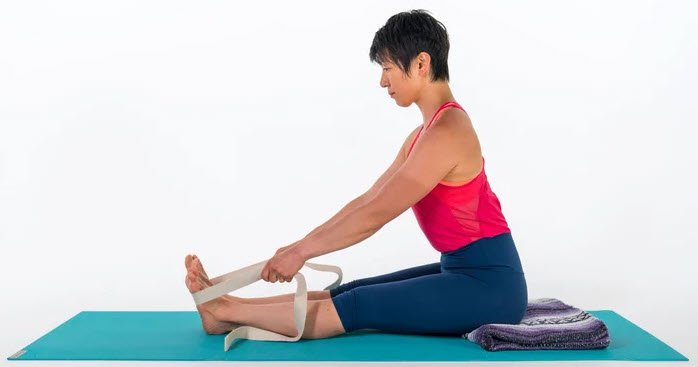
2. Seated Forward Bend (with Arm Extension)
Stretches entire back and neck, creates space in spine, opens chest, increases blood flow to facial muscles and brain, reverses flow of gravity and aging process, reduces stress, rejuvenates body, increases energy and more.
Instructions –
- Step 1: Sit slightly forward in your chair, feet flat on the floor, legs at a 90 degree angle. Contract your abdominal muscles slightly, lift up through your chest and lengthen your spine. Drop your shoulders down your back.
- Step 2: Interlock your hands together behind your back, making sure your palms are facing in, NOT out. Slide your shoulders down your back, and squeeze your shoulder blades together, opening your chest.
- Step 3: As you inhale, get taller, and as you exhale, fold forward, draping your torso over your legs. Press your arms up toward the ceiling, and continue to squeeze your shoulders together. If it’s difficult to breathe, lower your arms a little at a time, until you can breathe deeply with ease. Stay here and breathe deeply for 30-60 seconds.
- Step 4: To come out, take one last inhale as you raise your arms and hands up, then exhale and lower your arms to your back, letting your hands separate. Bring your arms down over your body in front and hang forward for a few moments. Then, place your hands on your knees, and as you inhale, rag doll yourself up to a seated position, letting your head be completely heavy. When you reach the top, roll your shoulders up, back and down, lift your head back to its’ normal position, then sit quietly for a few moments with your eyes closed. Open your eyes and return to work. Shake our your arms if necessary.
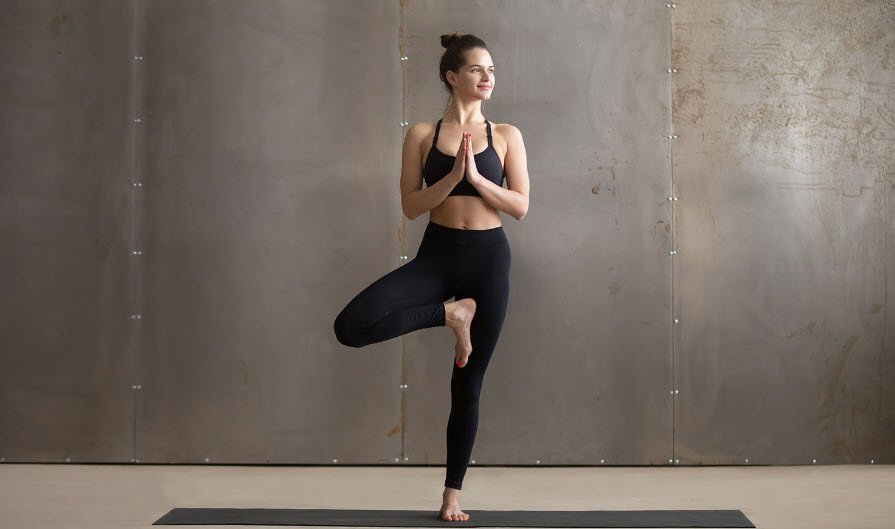
3. Tree Pose
Improves balance, memory and concentration. Strengthens legs, ankles, buttocks, back and abdominal muscles. Realigns the body. Open the hips. Improves focus and mental clarity and relaxes the mind.
Instructions –
- Step 1: Take both shoes off and stand evenly into both feet. Feel all four corners of each foot.
- Step 2: Gaze at a spot on the wall ahead of you. (This is a called a “drishti” in yoga class.) Shift the weight into your right foot. Lift your left leg off the ground and place your left foot at your right ankle, knee or inner thigh. If your left foot is above your right knee, open your left knee out to the side by pressing your left foot into your right thigh.
- Step 3: As you inhale, place your heads into prayer position and bring them to your heart. If you find it difficult to balance this way, open your arms out to the sides.
- Step 4: Pull in your abdominal muscles, tuck your tailbone under, lift up through your chest and relax your shoulders. Keep breathing.
- Step 5: To go a step further, as you inhale, open your arms out to the sides and place palms together above your head. To go even further, shift your focal point up to the ceiling by gazing upwards with your eyes. Move slowly.
- Step 6: To come out, bring your hands back to your chest, gaze comes forward. Inhale, lift through your chest one last time, and as you exhale, release your hands, lower your arms and release your left leg to the floor. Shake out your legs and repeat on the other side. Don’t take balancing poses so seriously. Have fun with this one!
4. Neck Stretch
Stretches neck and shoulders, reduces tension and relieves tired muscles, promotes better posture, increases circulation to brain and facial muscles, increases energy, reduces overall stress and promotes a deep feeling of relaxation.

Instructions –
- Step 1: Sit in your chair, feet flat on the floor, legs at a 90 degree angle. Contract your abdominal muscles just slightly, lift up through your chest and lengthen your spine. Drop your shoulders down your back.
- Step 2: Place your hands on your thighs. As you inhale, lengthen through the crown of your head a little more, and as you exhale, gently lower your right ear toward your right shoulder. Relax your right shoulder and drop it down away from your right ear.
- Step 3: (Not Shown) Optional: To move deeper, release your left hand to the underside of your chair and gently hold on as you stretch deeper, maybe even leaning slightly to the right.
- Step 4: Stay here, breathing in and out, for at least 30 seconds.
- Step 5: Inhale and lift your head and body back to center. Exhale, lower your left ear toward your left shoulder. Repeat steps 3 and 4 on this side.
- Step 6: To come out, inhale your head and body back to center. Give your shoulders a shake, and repeat again on both sides if you have time.
5. Seated Hip Stretch
Releases tension in hips, buttocks and legs, increases circulation to lower body, including hips, thighs and buttocks, provides a deep stretch to hips, improves sex drive and fertility (in women) and more.
Instructions –
- Step 1: Sit slightly forward on your chair, legs at a 90° angle, feet flat on the floor. Contract your abdominal muscles, roll your shoulders back and down, and lift your chest up.
- Step 2: Place your right ankle on top of your left knee and let your right knee relax out to the side.
- Step 3: As you inhale, sit up tall and as you exhale press your heart forward. Continue to inhale as you lengthen, and exhale to move deeper into the stretch. Keep your back flat and spine lengthened as you move deeper. You should feel a deep stretch in your right hip and buttock.
- Step 4: Stay for 3-5 breaths. To come out, inhale and sit up straight up again, then release your right foot back to the floor as you exhale.
- Step 5: Repeat on the other side. Then sit quietly with eyes closed for a moment and breath normally before returning to work.
6. Downward Facing Dog (Using Chair/Desk)
Stretches spine, back of legs, ribcage and more, relieves back tension, facilitates deeper breathing and more.
Instructions –
- Step 1: Remove your shoes and socks if possible. Stand behind your chair with your hands on the back of the chair, about shoulder width apart. Take a few steps backward with both feet until your legs are perpendicular to the floor and your back is straight. (Your back and legs will be at a 90 degree angle with other and you will be looking straight down at the floor.) Let your head relax.
- Step 2: Take a deep inhale, and as you exhale, press your hips and sitting bones back to the wall behind you. Pull your abdominal muscles in and feel your spine stretching
and lengthening. Breathe. - Step 3: Spread your fingers apart. Relax your shoulders and let them roll out and away from your ears.
- Step 4: Hold for 5 deep breaths if you can, then to release, walk your feet slowly forward and stand up straight. Release your arms down to your sides and stand in Tadasana (Mountain Pose) for 3 breaths with your eyes closed. Breathe slowly and deeply, and enjoy how you feel.
7. Seated Wrist Stretch
Stretches and decompresses wrists, increases circulation to wrists, prevents and helps reduce symptoms of carpal tunnel syndrome.
Instructions –
- Step 1: Sit slightly forward in your chair, feet flat on the floor, legs at a 90 degree angle. Contract your abdominal muscles slightly, lift up through your chest and lengthen your spine. Drop your shoulders down your back.
- Step 2: As you inhale, reach your right arm straight out to the front. As you exhale, point your fingers up and press through the palm of your hand, as if trying to press into an imaginary wall. As you inhale again, reach your left arm straight out and place your left hand on palm side of your right hand, only from the right fingers up (not covering the palm of your right hand).
- Step 3: Now, pull back gently with your left hand, and press out gently through your right hand, being mindful not to extend the fingers on your right hand back, but rather to maintain gentle but firm pressure.
- Step 4: Take 3-5 deep breaths here. To release, simply lower both hands and arms down. Repeat on the other side.
8. Seated Twist
Decreases stiffness and increases flexibility in back, massages and detoxifies internal organs (especially the kidneys), reduces stress, increases energy, increases range of motion and more.
Instructions –
- Step 1: Sit slightly forward on your chair, feet flat on the floor, legs at a 90 degree angle. Contract your abdominal muscles slightly, lift up through your chest and lengthen your spine. Drop your shoulders down your back.
- Step 2: Cross your right leg over your left and place the back of your left hand to the inside of your left knee. As you inhale, lengthen your spine and reach your right arm straight up. As you exhale, twist to the right. Bend your right arm and place the palm of your right hand either to the back of the chair or on top of it. As you inhale, lengthen, and as you exhale, twist deeper.
- Step 3: Keep your shoulders relaxed, chest lifted, breath easy. Twist more with your heart, not your neck. Stay here for 5 breaths.
- Step 4: To come out, release your right hand from the chair, and as you inhale, come back to centre, reaching straight up with your right hand. As you exhale, release your hand down. Uncross your legs, place both hands on your thighs, then repeat on the other side. Step 5: When you have finished on both sides, do a Seated Forward Bend, (#2 in this series) then roll up and return to work.
9. Shoulder Rotations
Releases tension in shoulders, neck, chest, arms, back, jaw and facial muscles, Improves posture, reduces stress, increases circulation to entire upper body, improves flexibility in shoulders and more.
Instructions –
- Step 1: Sit slightly forward in your chair, feet flat on the floor, legs at a 90 degree angle. Contract your abdominal muscles slightly, lift up through your chest and lengthen your spine. Drop your shoulders down your back.
- Step 2: Place your hands on your shoulders. As you inhale, press your elbows forward, Then up, look up, and as you exhale, press your elbows out to the sides, behind you (squeezing your shoulder blades together into your back), then down Repeat 3-5 times, moving in a circular motion. Keep your jaw, shoulders, elbows and facial muscles relaxed as you move. Keep the movements slow and easy.
- Step 3: Shake out your arms and return to work.
10. Breaths with Arms Overhead
Improves posture, increases energy, decreases stress, increases circulation and blood flow to heart and lungs, decreases tension in chest, arms, neck, shoulders and back, reduces fatigue and more.
Instructions –
- Step 1: Sit in your chair, feet flat on the floor, legs at a 90 degree angle. Contract your abdominal muscles just slightly, lift up through your chest and lengthen your spine. Drop your shoulders down your back.
- Step 2: Exhale your breath all the way out. As you inhale, sweep your arms up toward the sky. Lengthen your spine and rib cage. Look up if it’s okay for your neck. Keep your abdominals contracted, tailbone tucked slightly. Continue to sweep your arms up until palms are touching. As you exhale, turn your palms down and bring your arms back down by your sides, turning your eyes forward again.
- Step 3: Repeat 3-5 times. When you are finished, sit quietly, palms on your thighs, and take a few breaths.
- Forward Fold Yoga – Embrace Spinal Release and Flexibility
- Helpful Tips For Practicing Lizard Pose Yoga
- 3 Ways to Exercise on a Busy Schedule
- Top Ten Tips for a Great Yoga Practice
- 100 Best Yoga Books – Free Download
- Using Yoga for Weight Loss – Balancing Body and Mind
- Kapalabhati – A Breathing Exercise for Holistic Well-being
- 7 Killer Ways to Maximize Fat Burning in the Gym
- Improving Blood Circulation in Your Legs – Simple Exercises for Better Leg Health
- Long-Term Effects of Exercise on the Muscular System